
What does this mean when it comes to moving individual supports on a handrail? Well, the rules are equally weird, but differently weird.
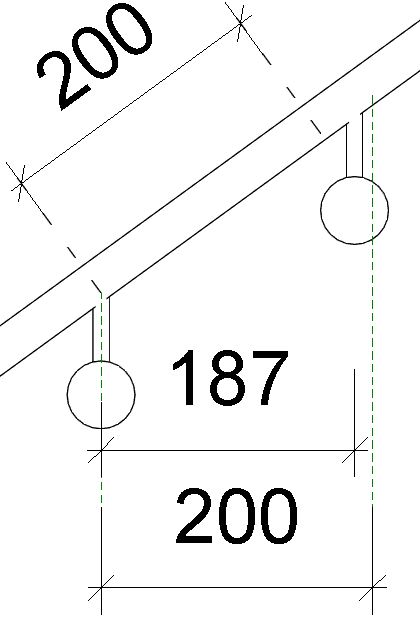
In the following example, you might want the spacing to be measured horizontally (in plan), so you need to move the supports on the sloping parts of the handrail.

The first thing to do is select just the support (Tab, select), and unpin it. This will allow you to slide the support along handrail - but most likely you want to be very precise about how far it is moved. You might try using the 'Align' tool, providing you have something like a reference plane to align to:
Law of Diminishing Returns

In this context, the Align tool does not do what you expect - it presents you with more Revit Weirdness. Once you select the reference plane to align to, then click on the support centreline, it moves the support only about two-thirds of the way (this fraction probably varies depending on the slope of the railing).
If you try Align again, it goes another two-thirds of the remaining distance.

Try again and you get closer - but you will never quite get there. There has to be a better way?

Move Weirdness
If you try using the 'Move' command, and select a horizontal distance, you get exactly the same result as the Align tool - it does not move it to where you tell it. The same 'Law of diminishing returns' applies.The Move (Workaround) Solution
The trick here is to use the move command, but make sure that you snap to the end point of the support, and then have a reference line that has an end (or intersection) point exactly where you want it to be placed - slightly above the underside of the handrail.
The Slide (Workaround) Solution
There is another trick - providing you have a (reference) line running vertically and stopping exactly where you want it to be placed (as with the previous workaround), you can just select it and slide it along the handrail, and it will snap to the right place. However, I do not recommend this because if your reference line is too long or short, it may look like it went to the right spot but could be slightly off. The move command is more precise.Reset Warning
If you click on the 'Reset Rail' or 'Reset Railing' commands, you will lose all of those careful support relocations on the whole handrail - each moved support would be moved back and repinned, while deleted supports would be reinstated (including those silly ones exactly on the ends of handrails).

What bother me with this new functions is, that it only works on 2-story stairs. When you have a multi-story staircase, you can't unpin the supports anymore.
ReplyDeleteSo you have to make sure you set the supports in the right place before creating a multu-story staircase. And we all know this doesn't happen, we first create the staircase and later change the details.
It is crazy - in Revit 2018, it seems like you cannot unpin supports on a multi-storey stair. However, the supports are actually all (sort of ) unpinned as soon as you make a stair multi-storey. You can still move, copy or delete them.
Delete2020 Revit: My problem starts at the stairwell center wall when using a 5 5/8” CMU wall. When setting the handrail for 3” distance, at the 90 deg + 90 deg turn will cause Revit to disconnect the handrails in this area. I have tried several methods to correct this with no luck.
ReplyDelete